
Learn an easy fingerpicking pattern that I use all the time
In this lesson, you’re going to learn an easy fingerpicking pattern that I find myself using all the time. It’s versatile, it sounds great, and it didn’t take long to become my favourite pattern when I learned it as a beginner guitarist.
This pattern sounds intricate, but if we break it down it’s fairly easy to learn. We’re going to start with the bass note and add another three layers on top of that. Each layer will alternate with the previous layer until it forms a pattern with a rich bassline, a solid harmony, and some cool melodic accents. Don’t worry if this sounds a little intimidating. We’ll break it down with some clear examples and you’ll be a fingerpicking expert in no time!
Before we get stuck in and learn the best fingerpicking pattern I’ve ever come across, let’s make sure you understand how to hold your right hand when you’re fingerpicking. There are a few styles of fingerpicking that all have slightly different right-hand positions, so don’t worry if this looks a little different from what you might have seen before. If I’m playing classical guitar, I might favour a more classical position; but I generally prefer this more contemporary style. It’s more versatile for popular music and this is what I usually teach beginner guitarists when they are learning how to fingerpick.
Fig. 1: How to hold your right hand when fingerpicking.
How to hold your right hand when fingerpicking:
Make a fist
Rest your fist on the strings
Relax your first
We can see this demonstrated in the image above. It can be tempting to roll your hand forward so you can see what you’re fingers are doing, but you don’t need to. This will actually make it harder as your fingers and thumb will move in the same line and end up getting in the way of each other. Instead, in the ‘relaxed fist’ position, our thumb is off to the side with plenty of room to move without getting in the way of our fingers.
Another helpful tip to keep in mind is the idea that a good hand position for fingerpicking looks almost exactly the same as a good hand position for holding a pick (See the example below). If how you’re holding a pick looks different from how you’re holding your hand when you’re fingerpicking, then you might want to have a look at your technique.
Fig.2: Good hand position fingerpicking looks almost exactly the same as a good hand position for holding a pick.
Now that we have our right hand in the best position for fingerpicking, let’s get to the pattern! This is a 16th note pattern, which means we will be dividing each beat into four slices. Let’s start by getting familiar with the bass note and adding layers on top of that. In these examples, we’ll be playing the pattern over an open G chord.

Fig. 3
The bass note will be playing every second 16th note, alternating with the other layers in our pattern. In the example above, the bass note is expressed using 8th notes as we haven’t added the other layers yet. Make sure you’re holding your right hand using a good fingerpicking technique and play the bass note with your thumb.
In the next layer, we’ll be adding our index finger, playing an open D string. We’ll alternate these with our bass note.

Fig. 4
Now, we’re playing every slice of the 16th note pattern.
In the third layer, we’ll add our second finger playing the open G string. This layer will alternate with the previous layer, meaning that every second time we would play the index finger, we’ll play the second finger instead.

Fig. 5
In the final layer, we’ll add the third finger playing the B string. Just like before, this layer will alternate with the previous layer. In this case, our third finger will alternate with the second finger. This means that every second time we would play our second finger, we’ll play our third finger instead.

Fig. 6
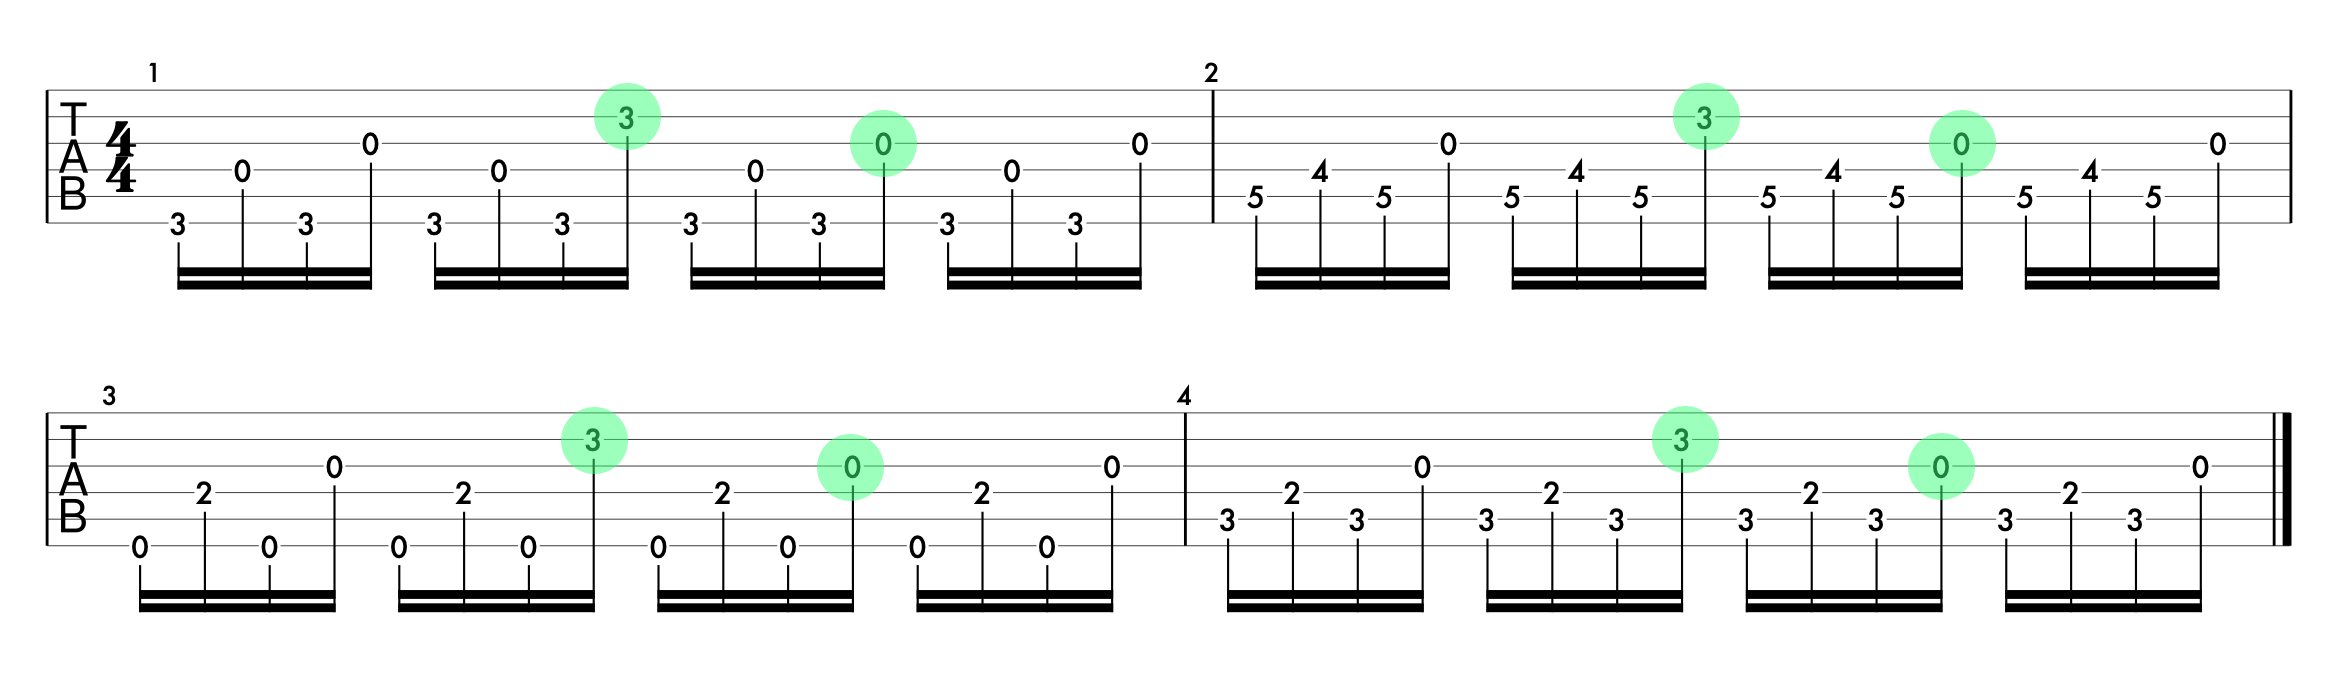
If we stick to the pattern these layers create exactly, we’ll be playing the top note on the B string twice. Once in beat two and once in beat four. However, another nice variation is to only play the top note on the second beat, playing beat four the same way we would play beat three.
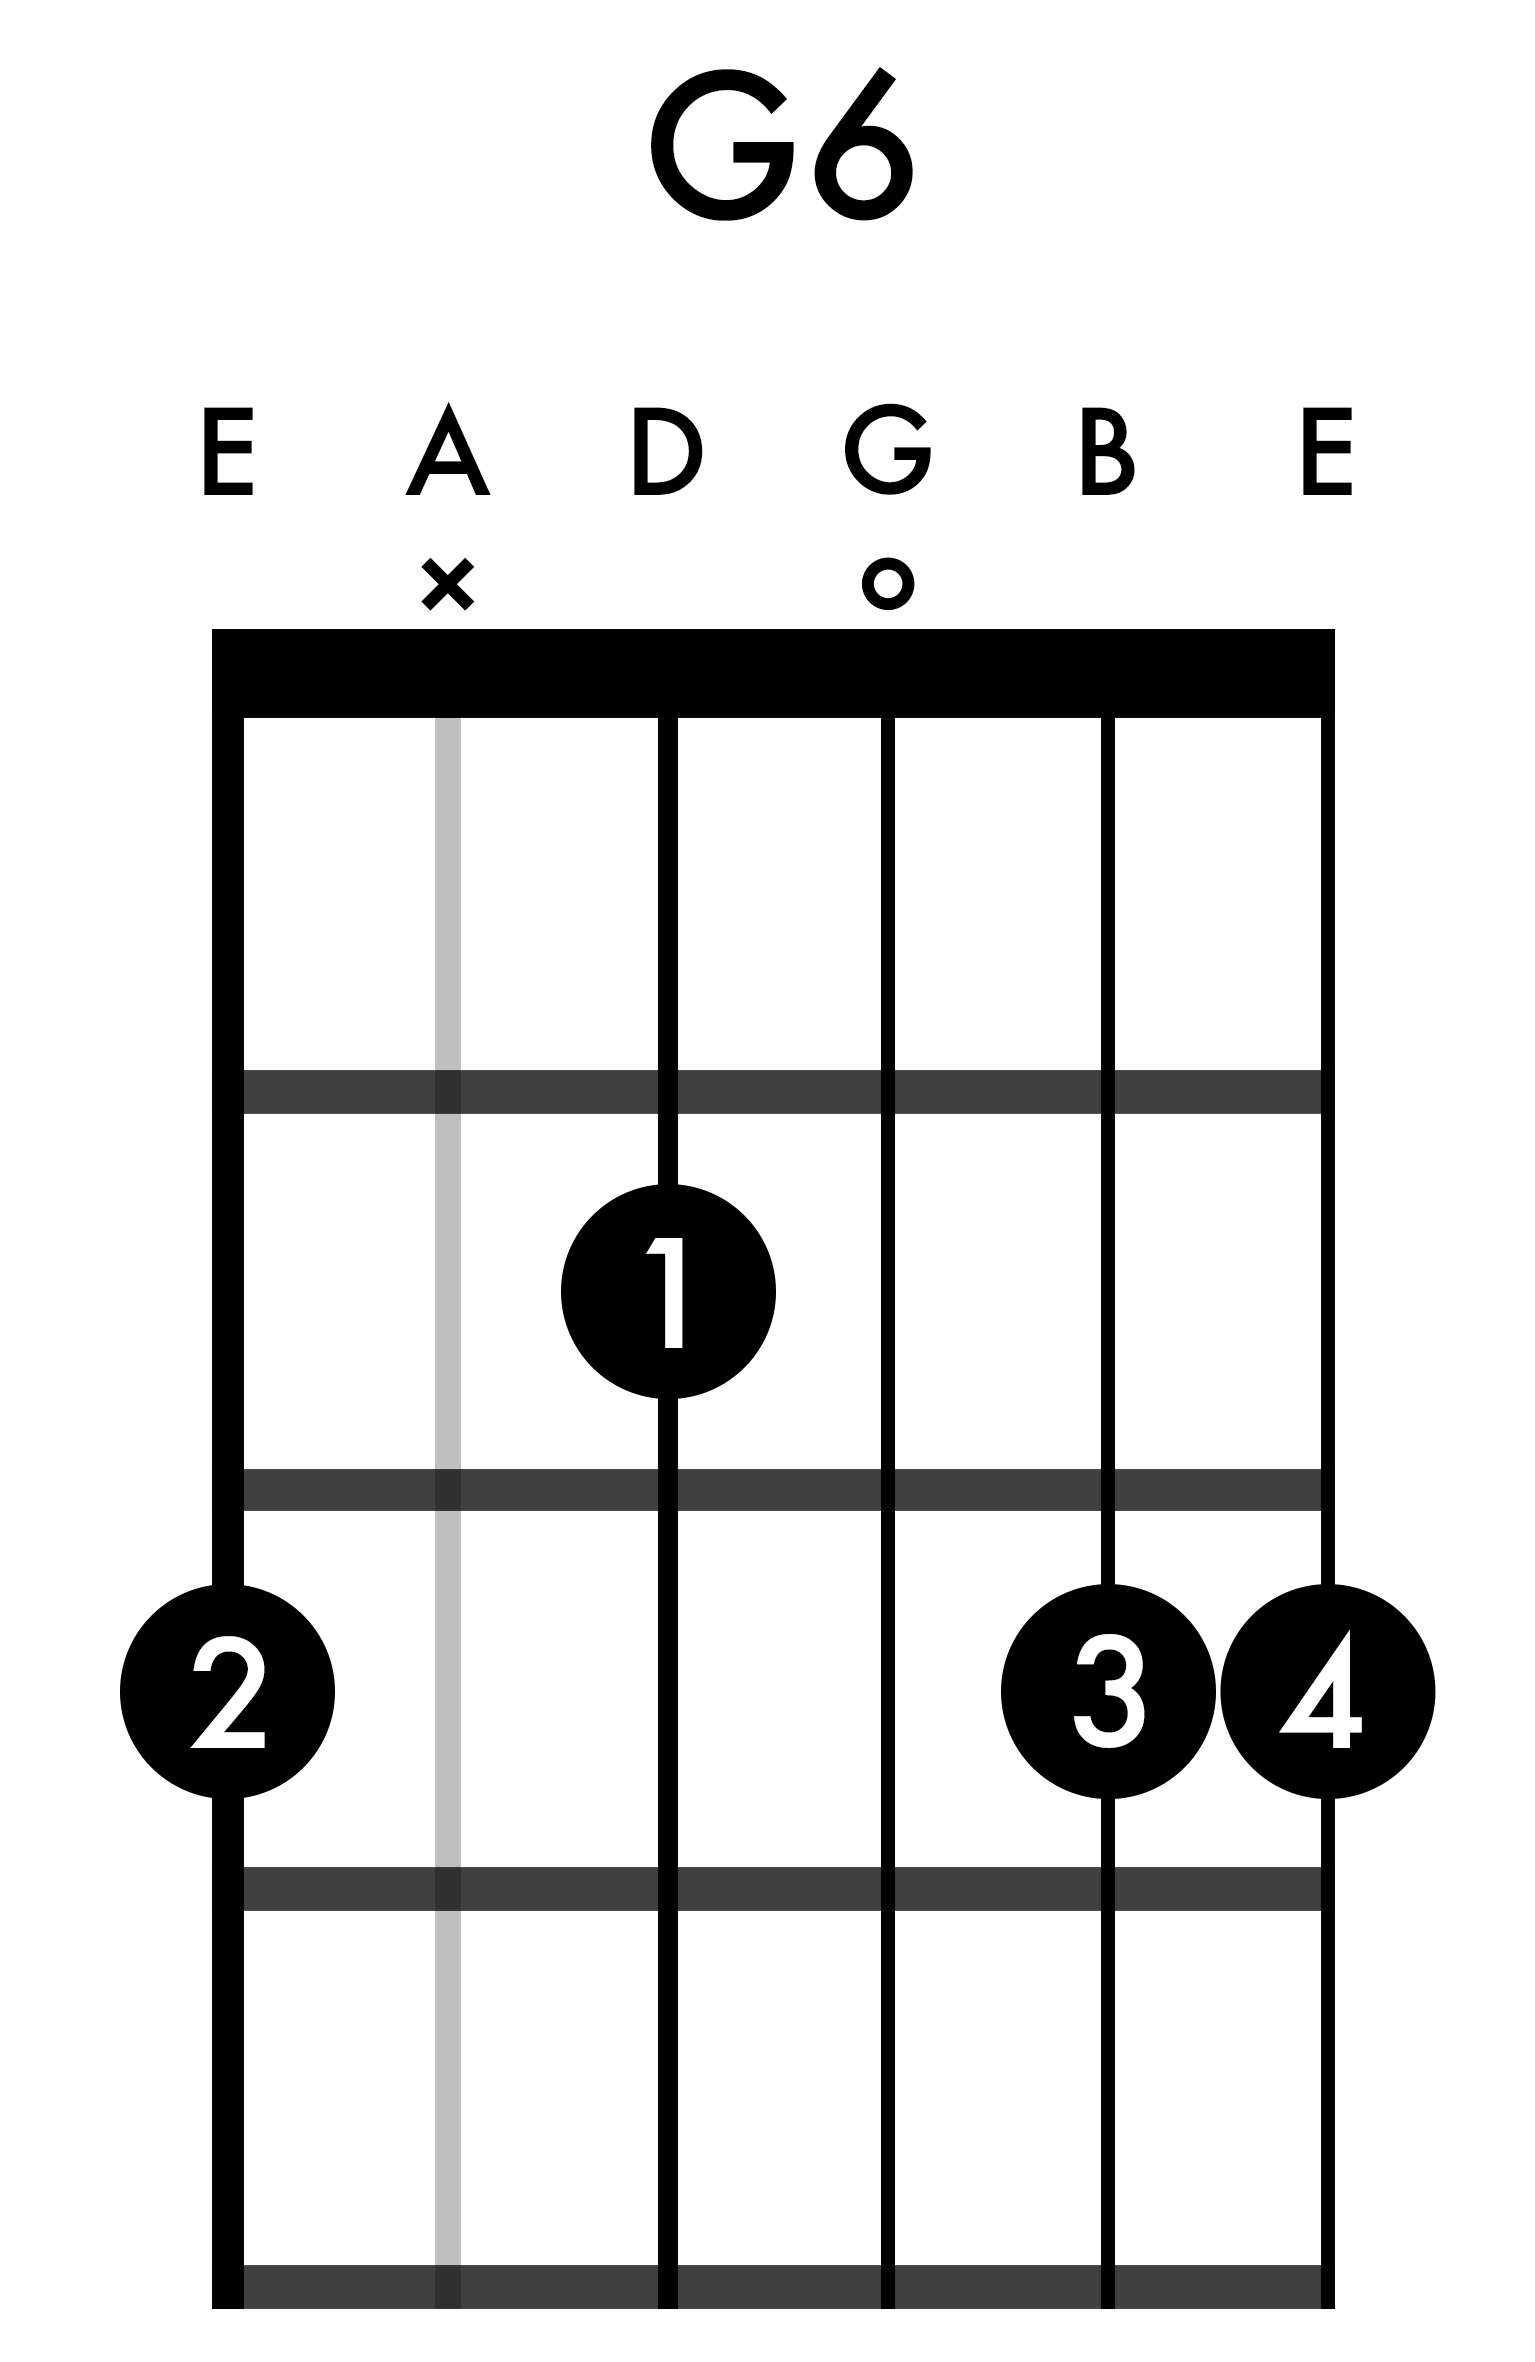
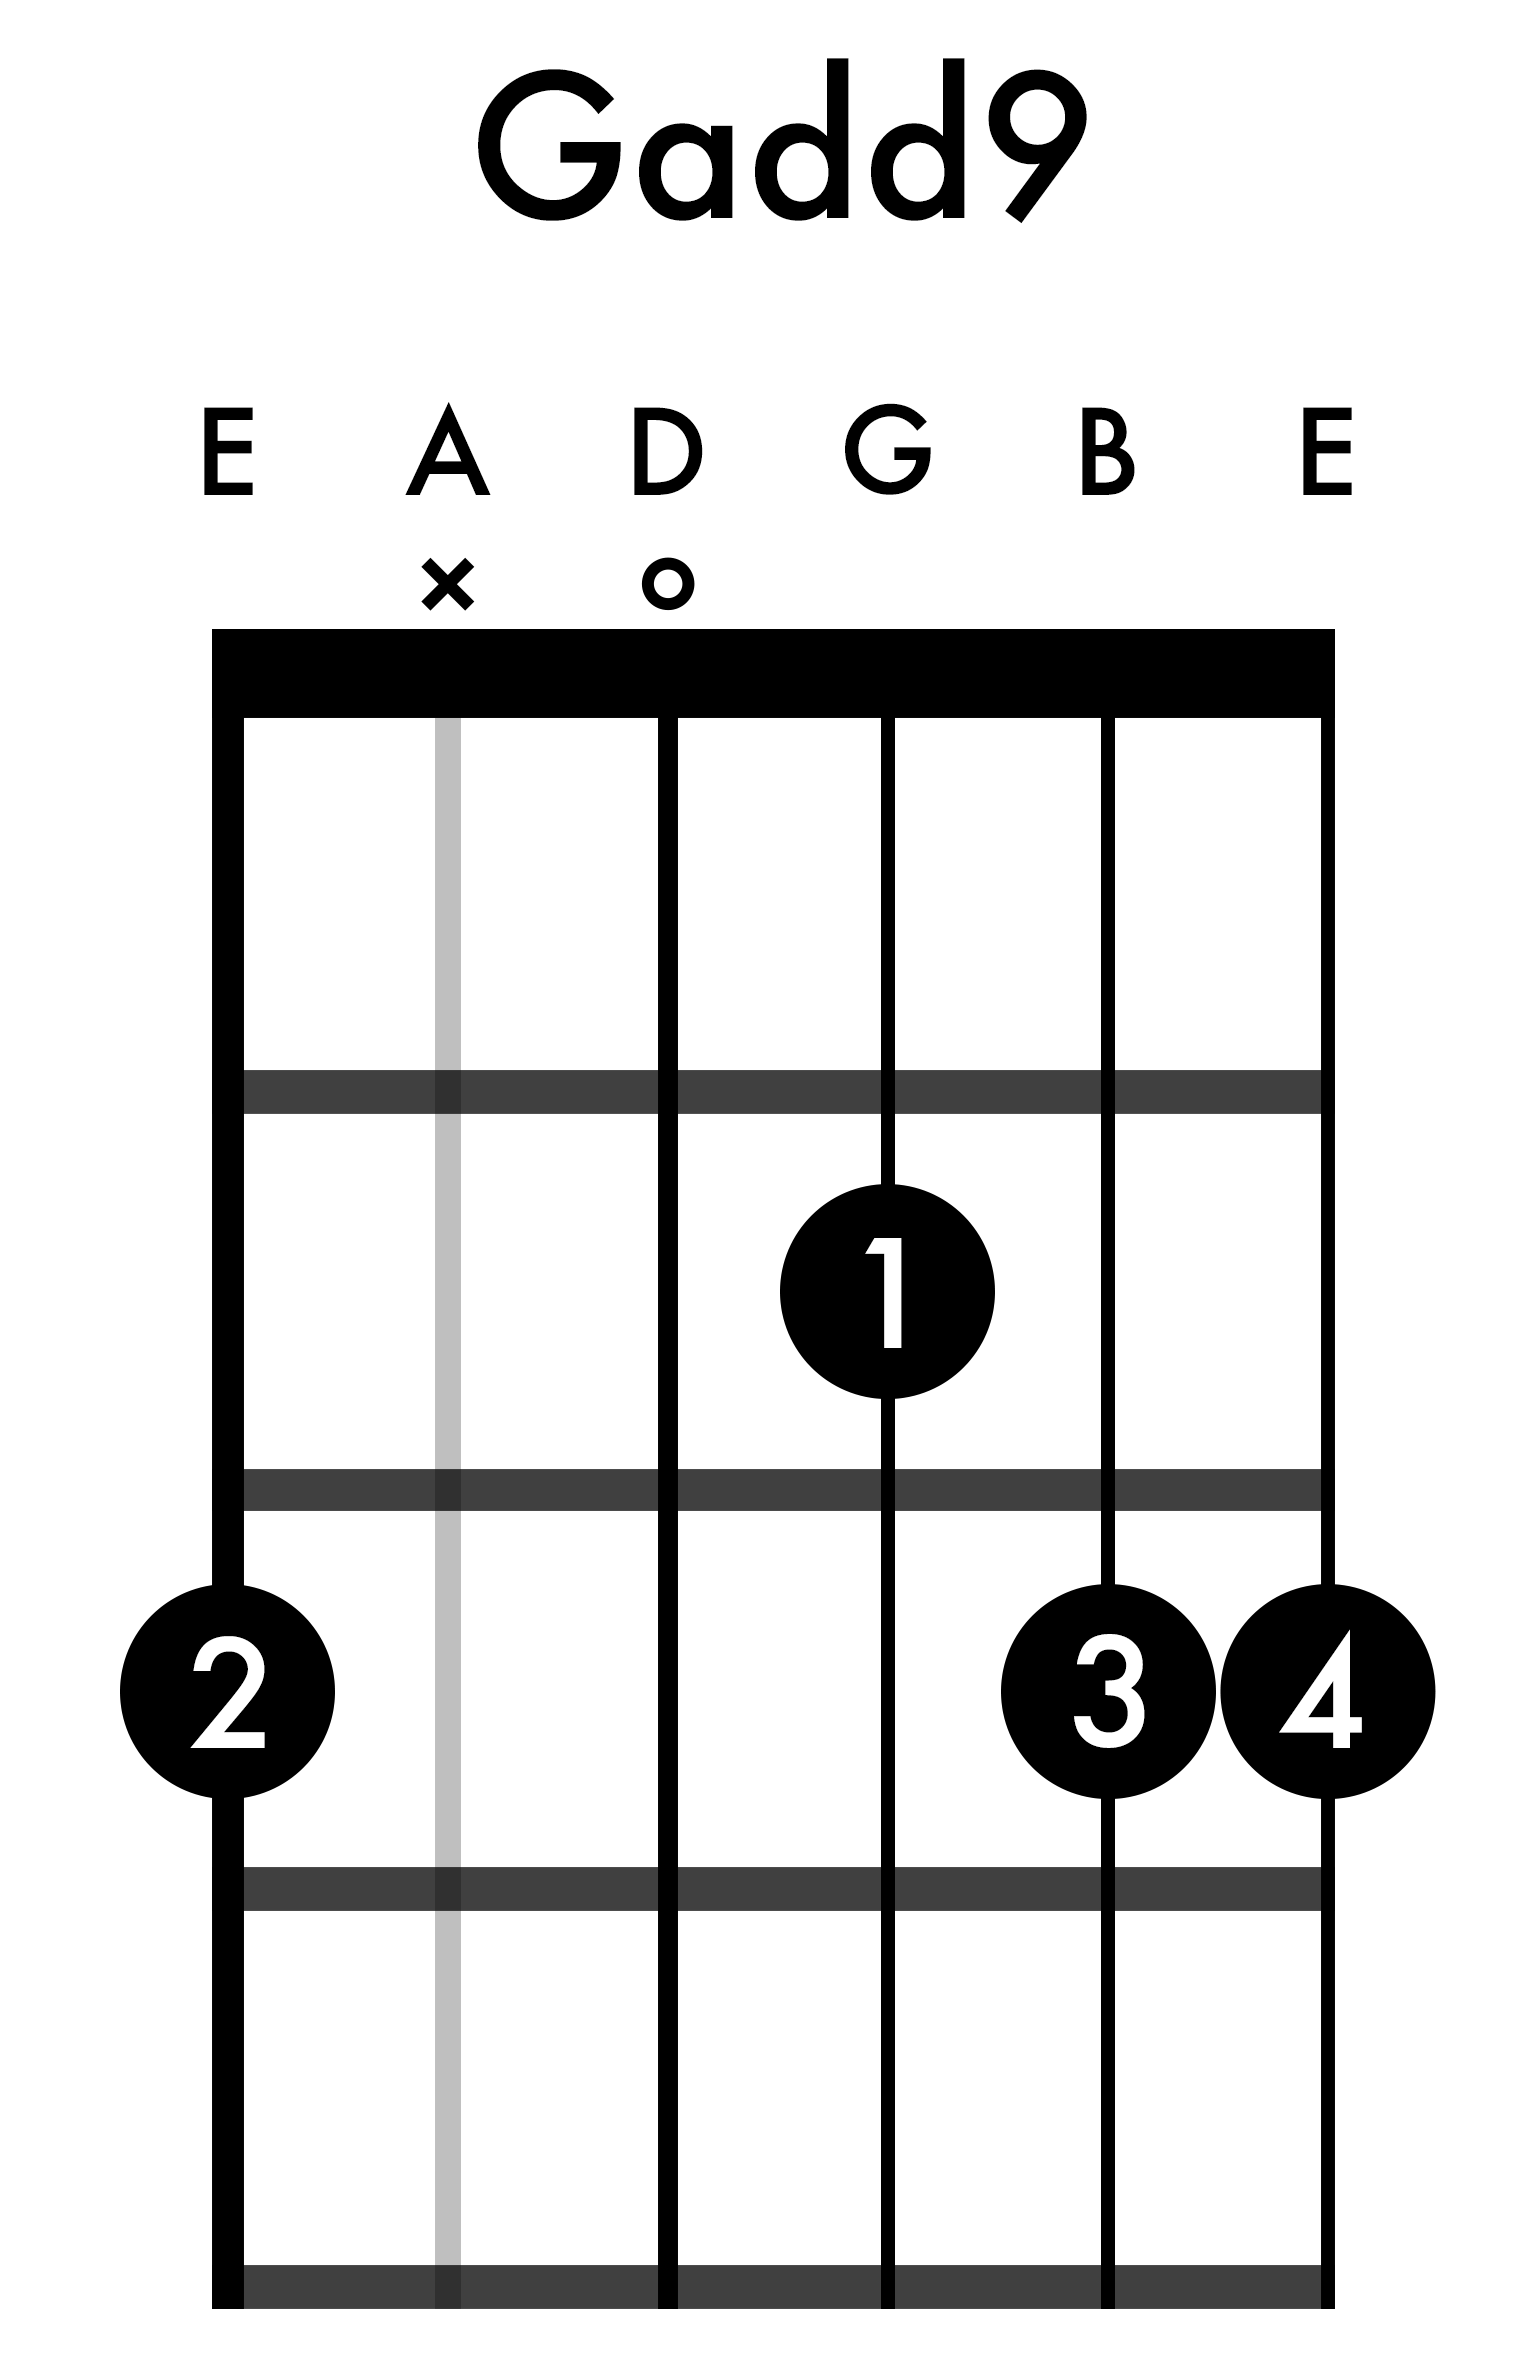
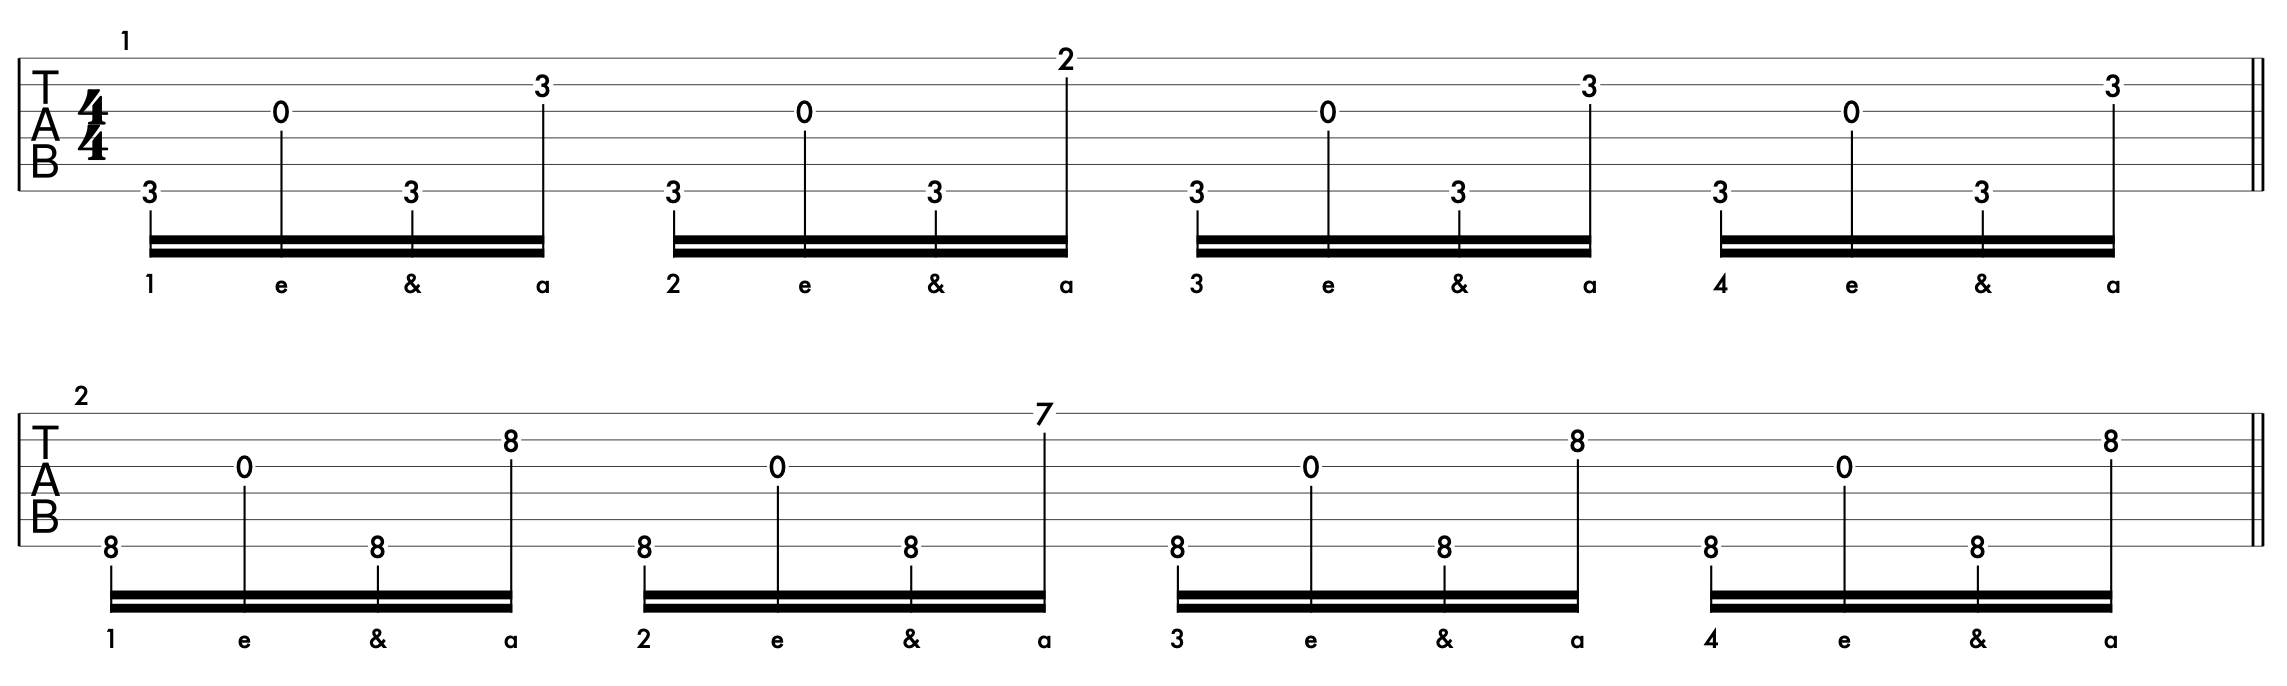
Use these chord shapes to play the TAB below (in Fig.7).
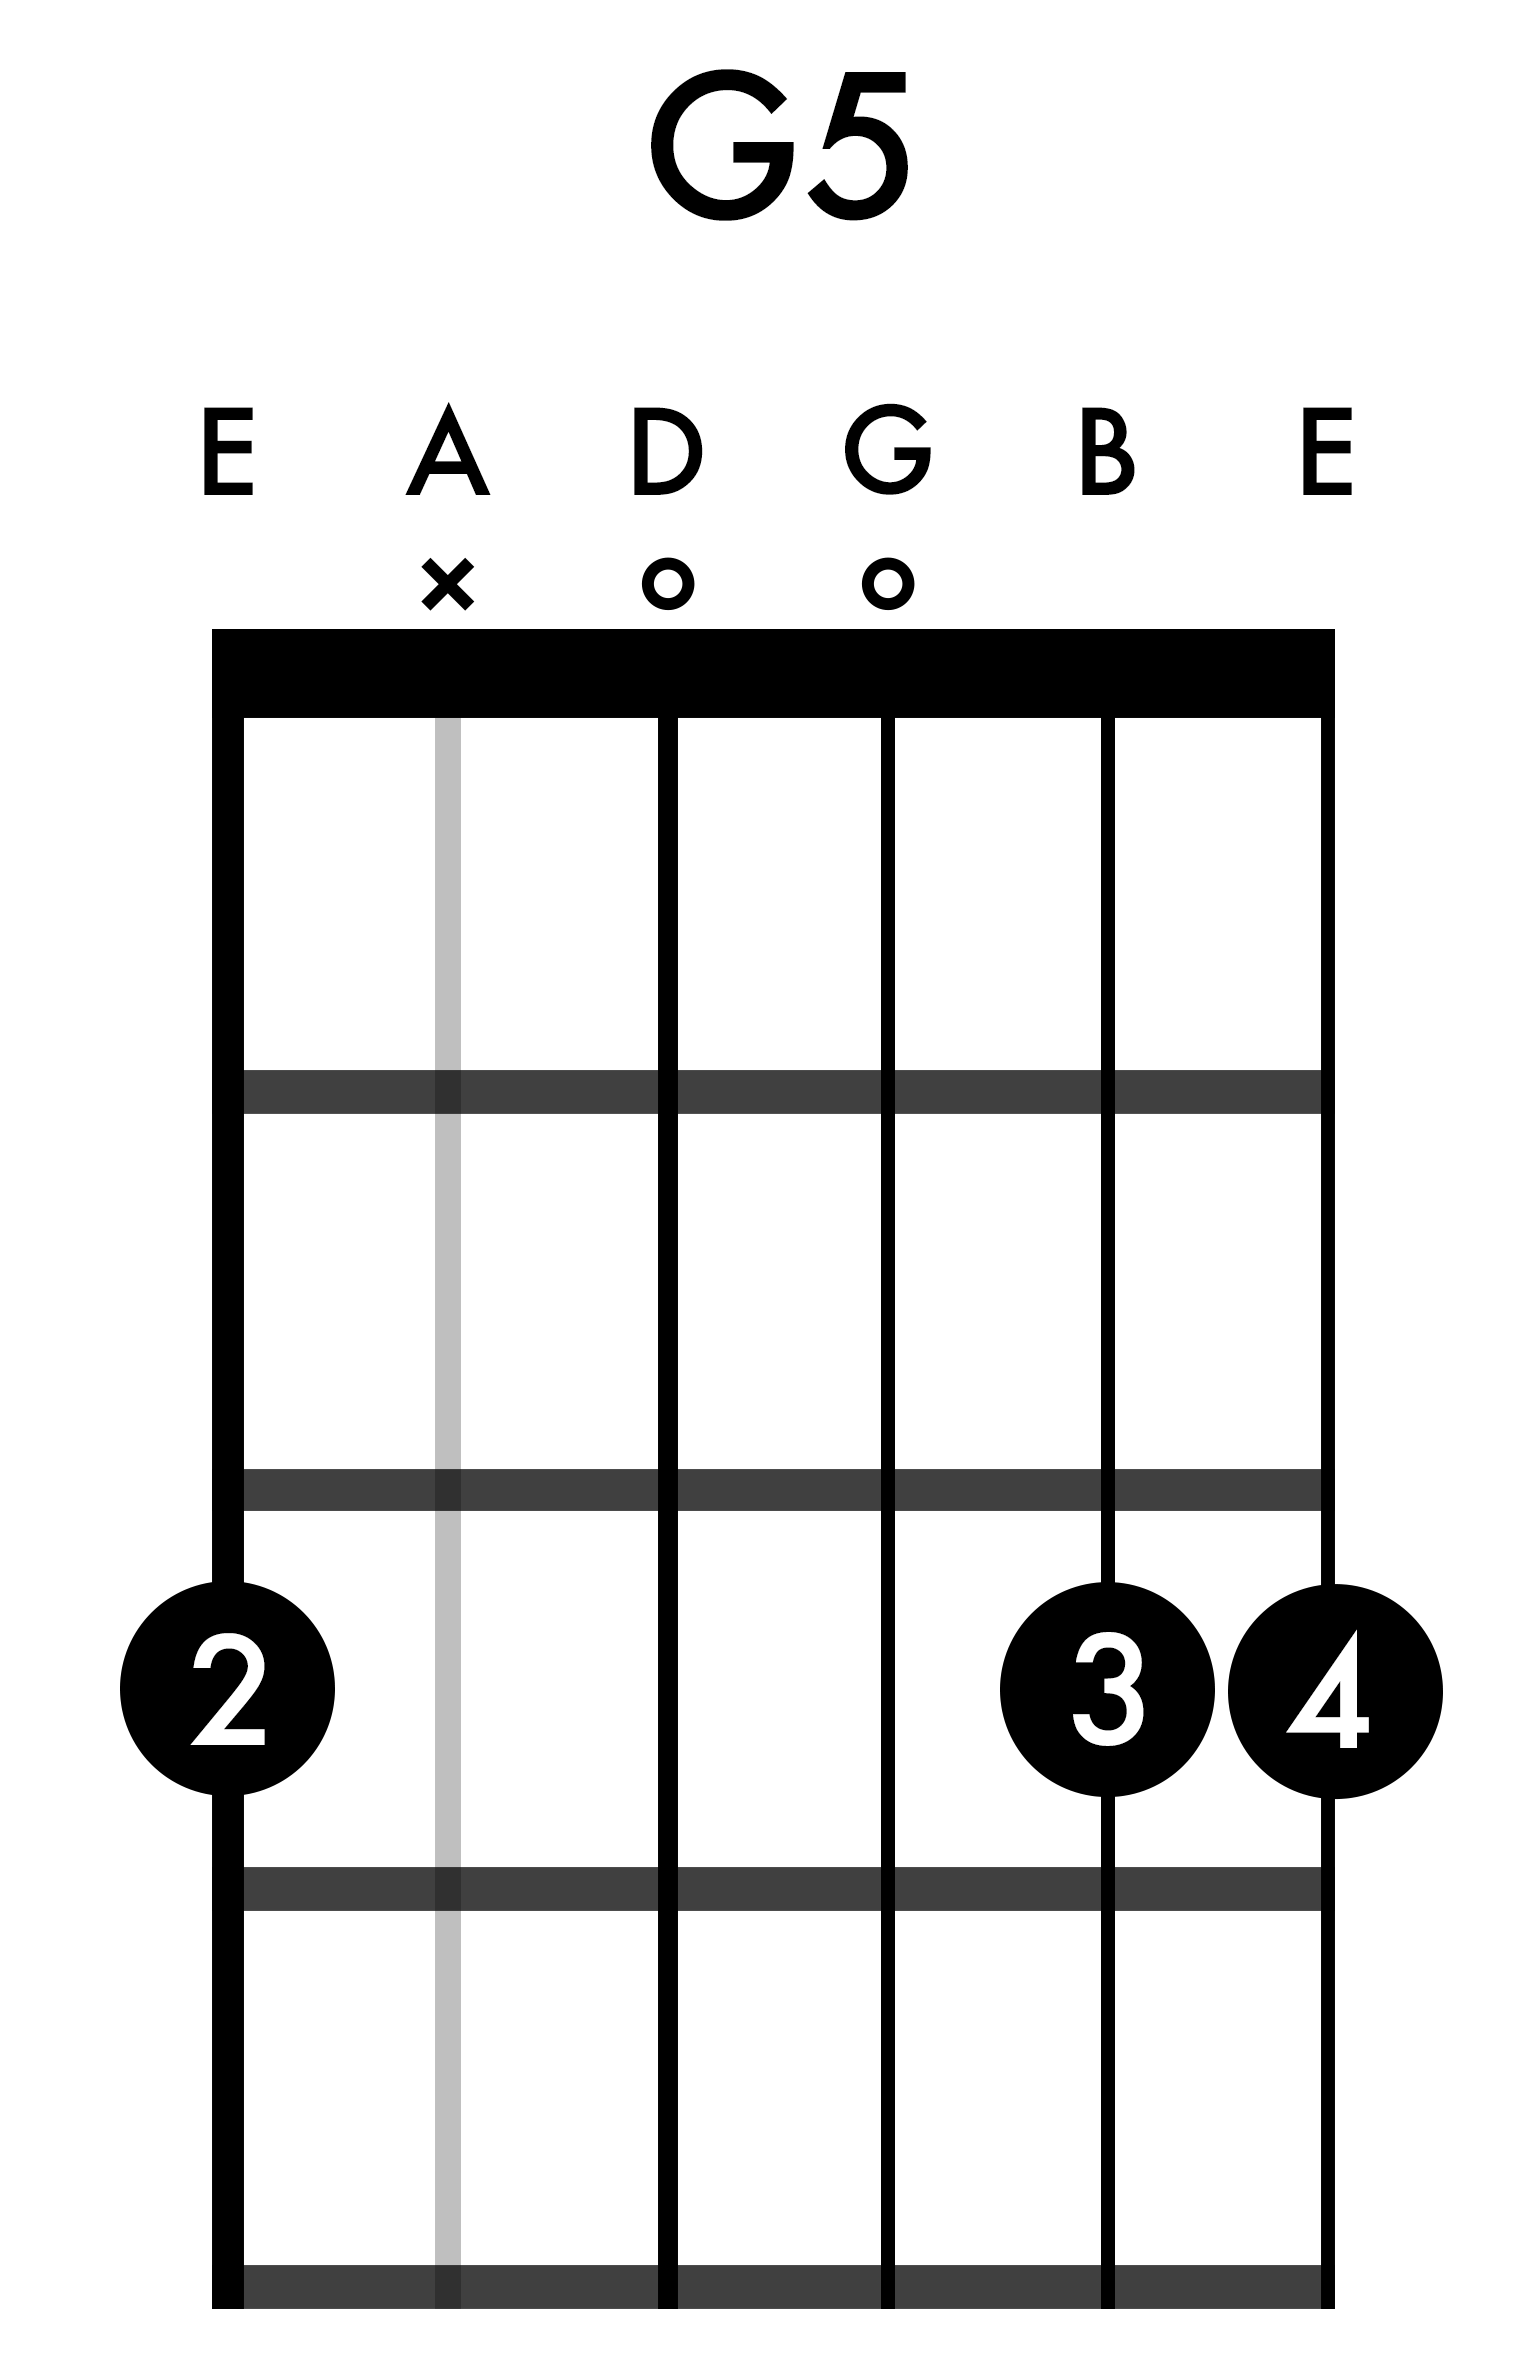
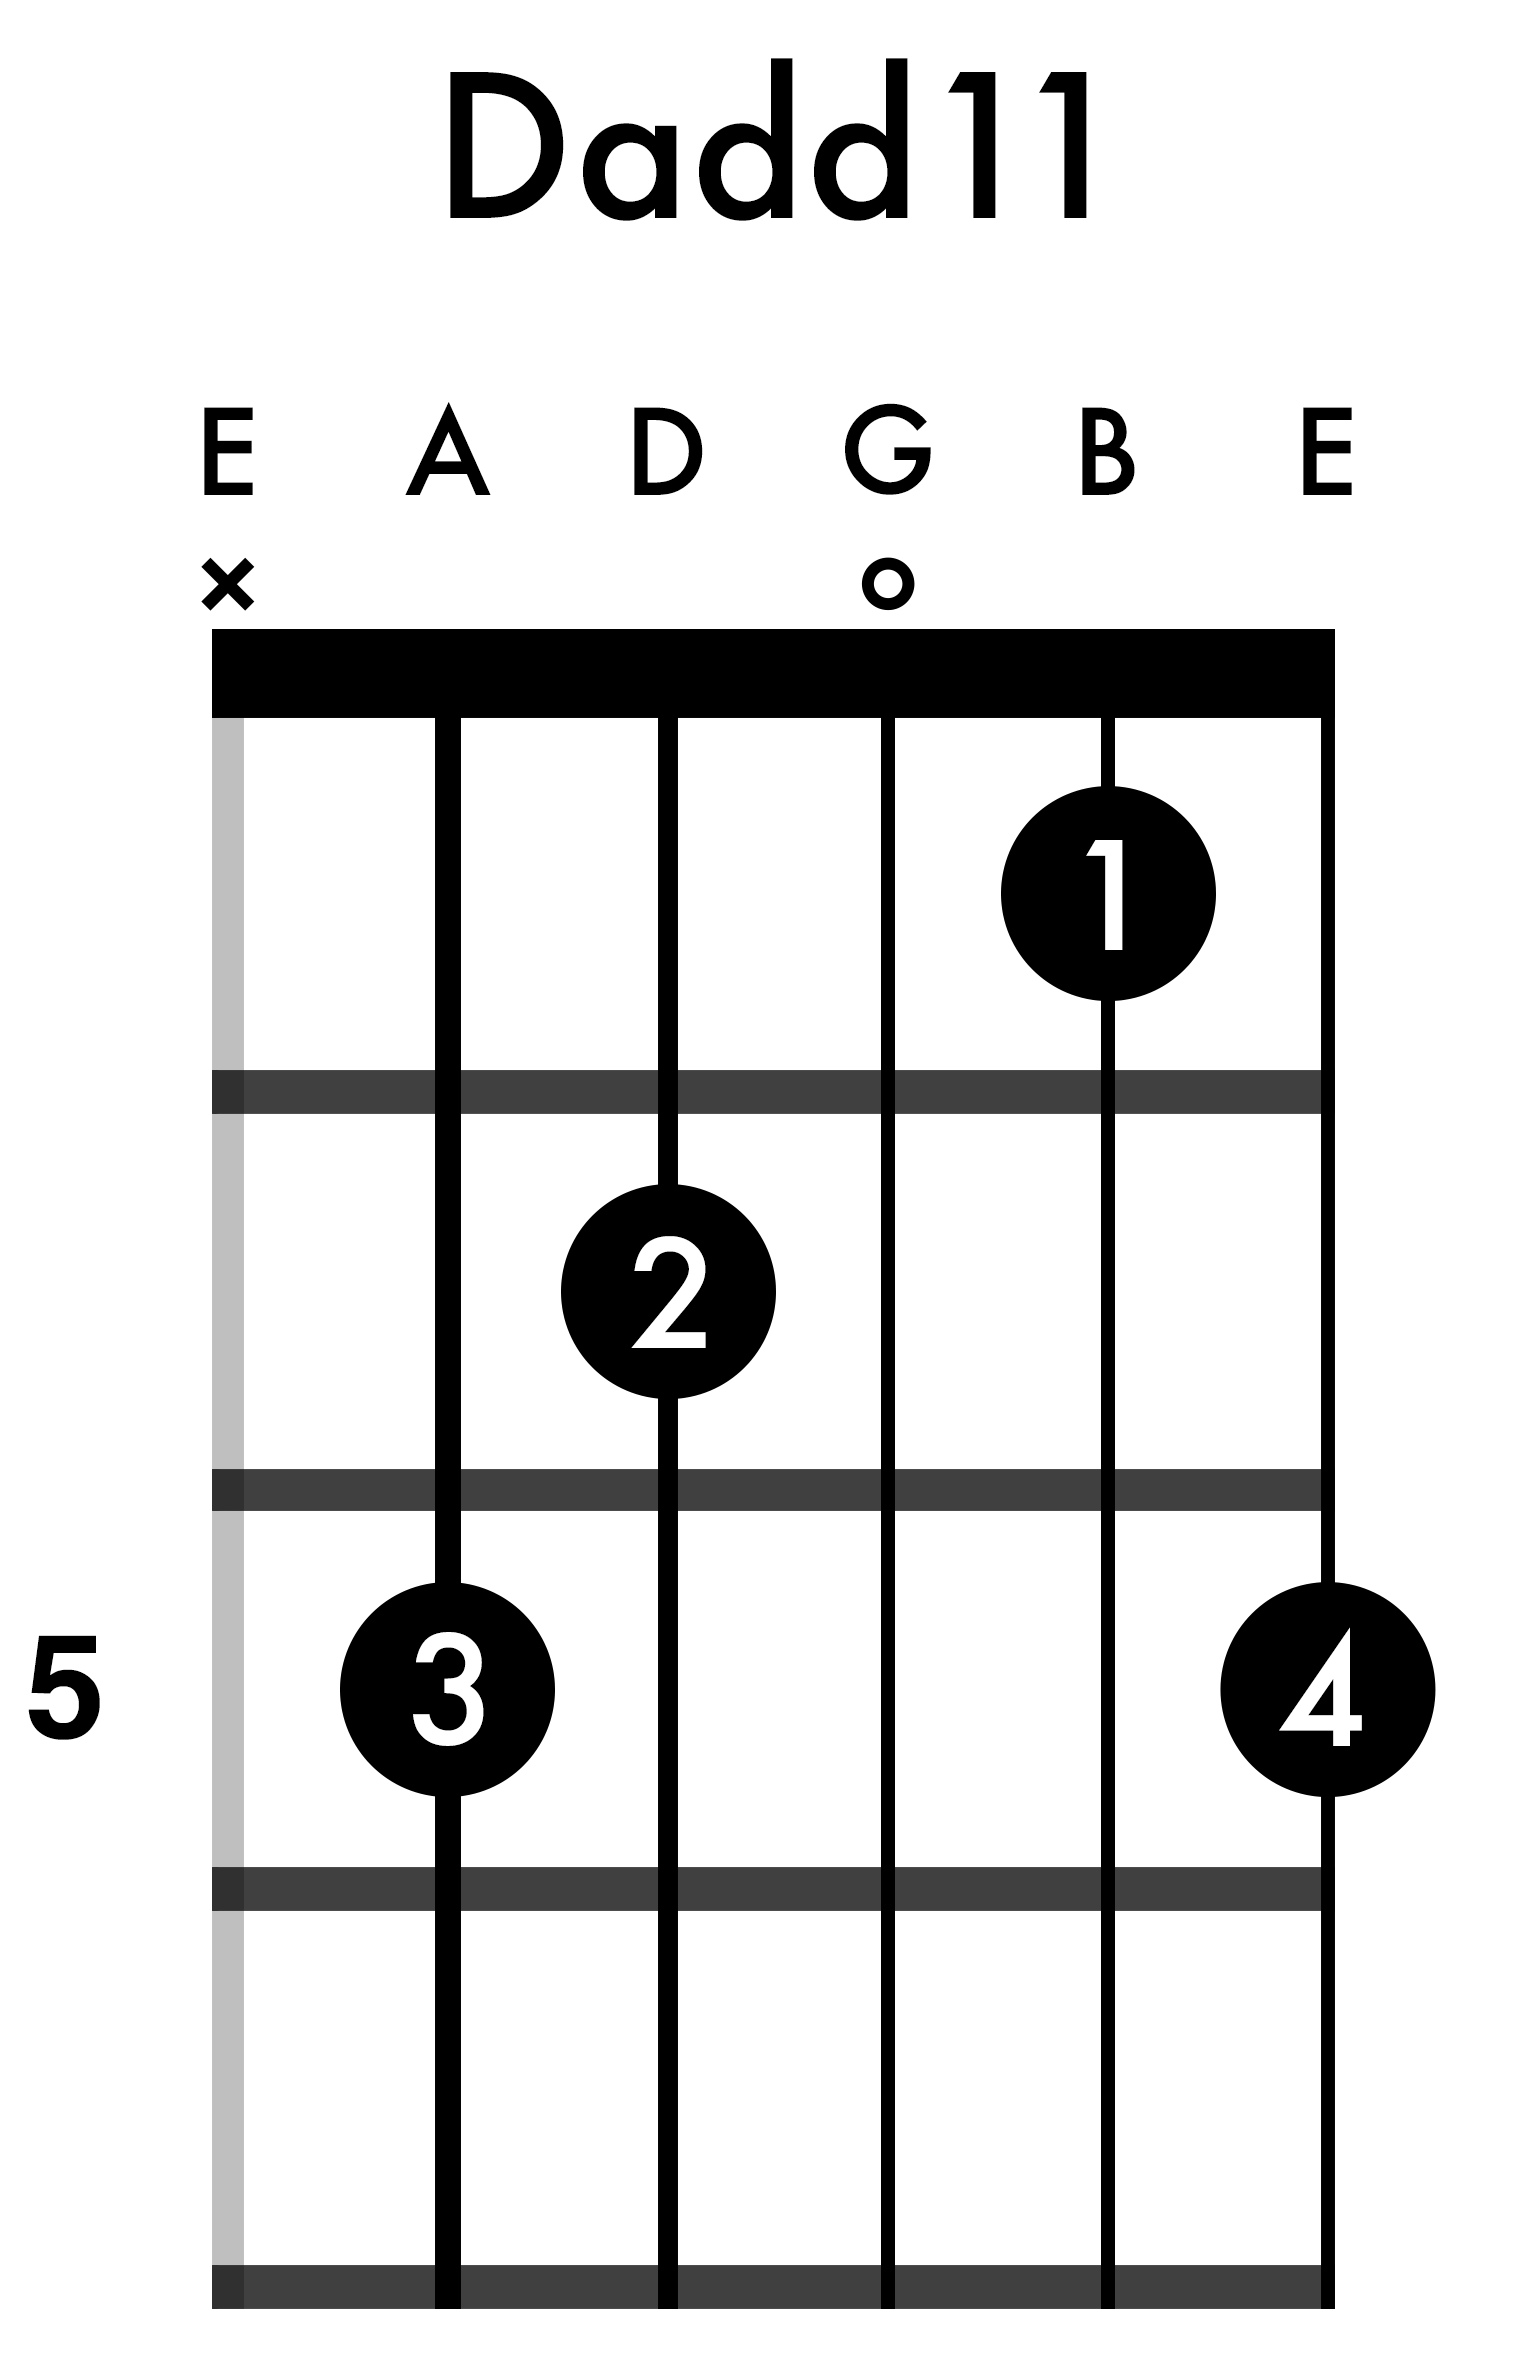
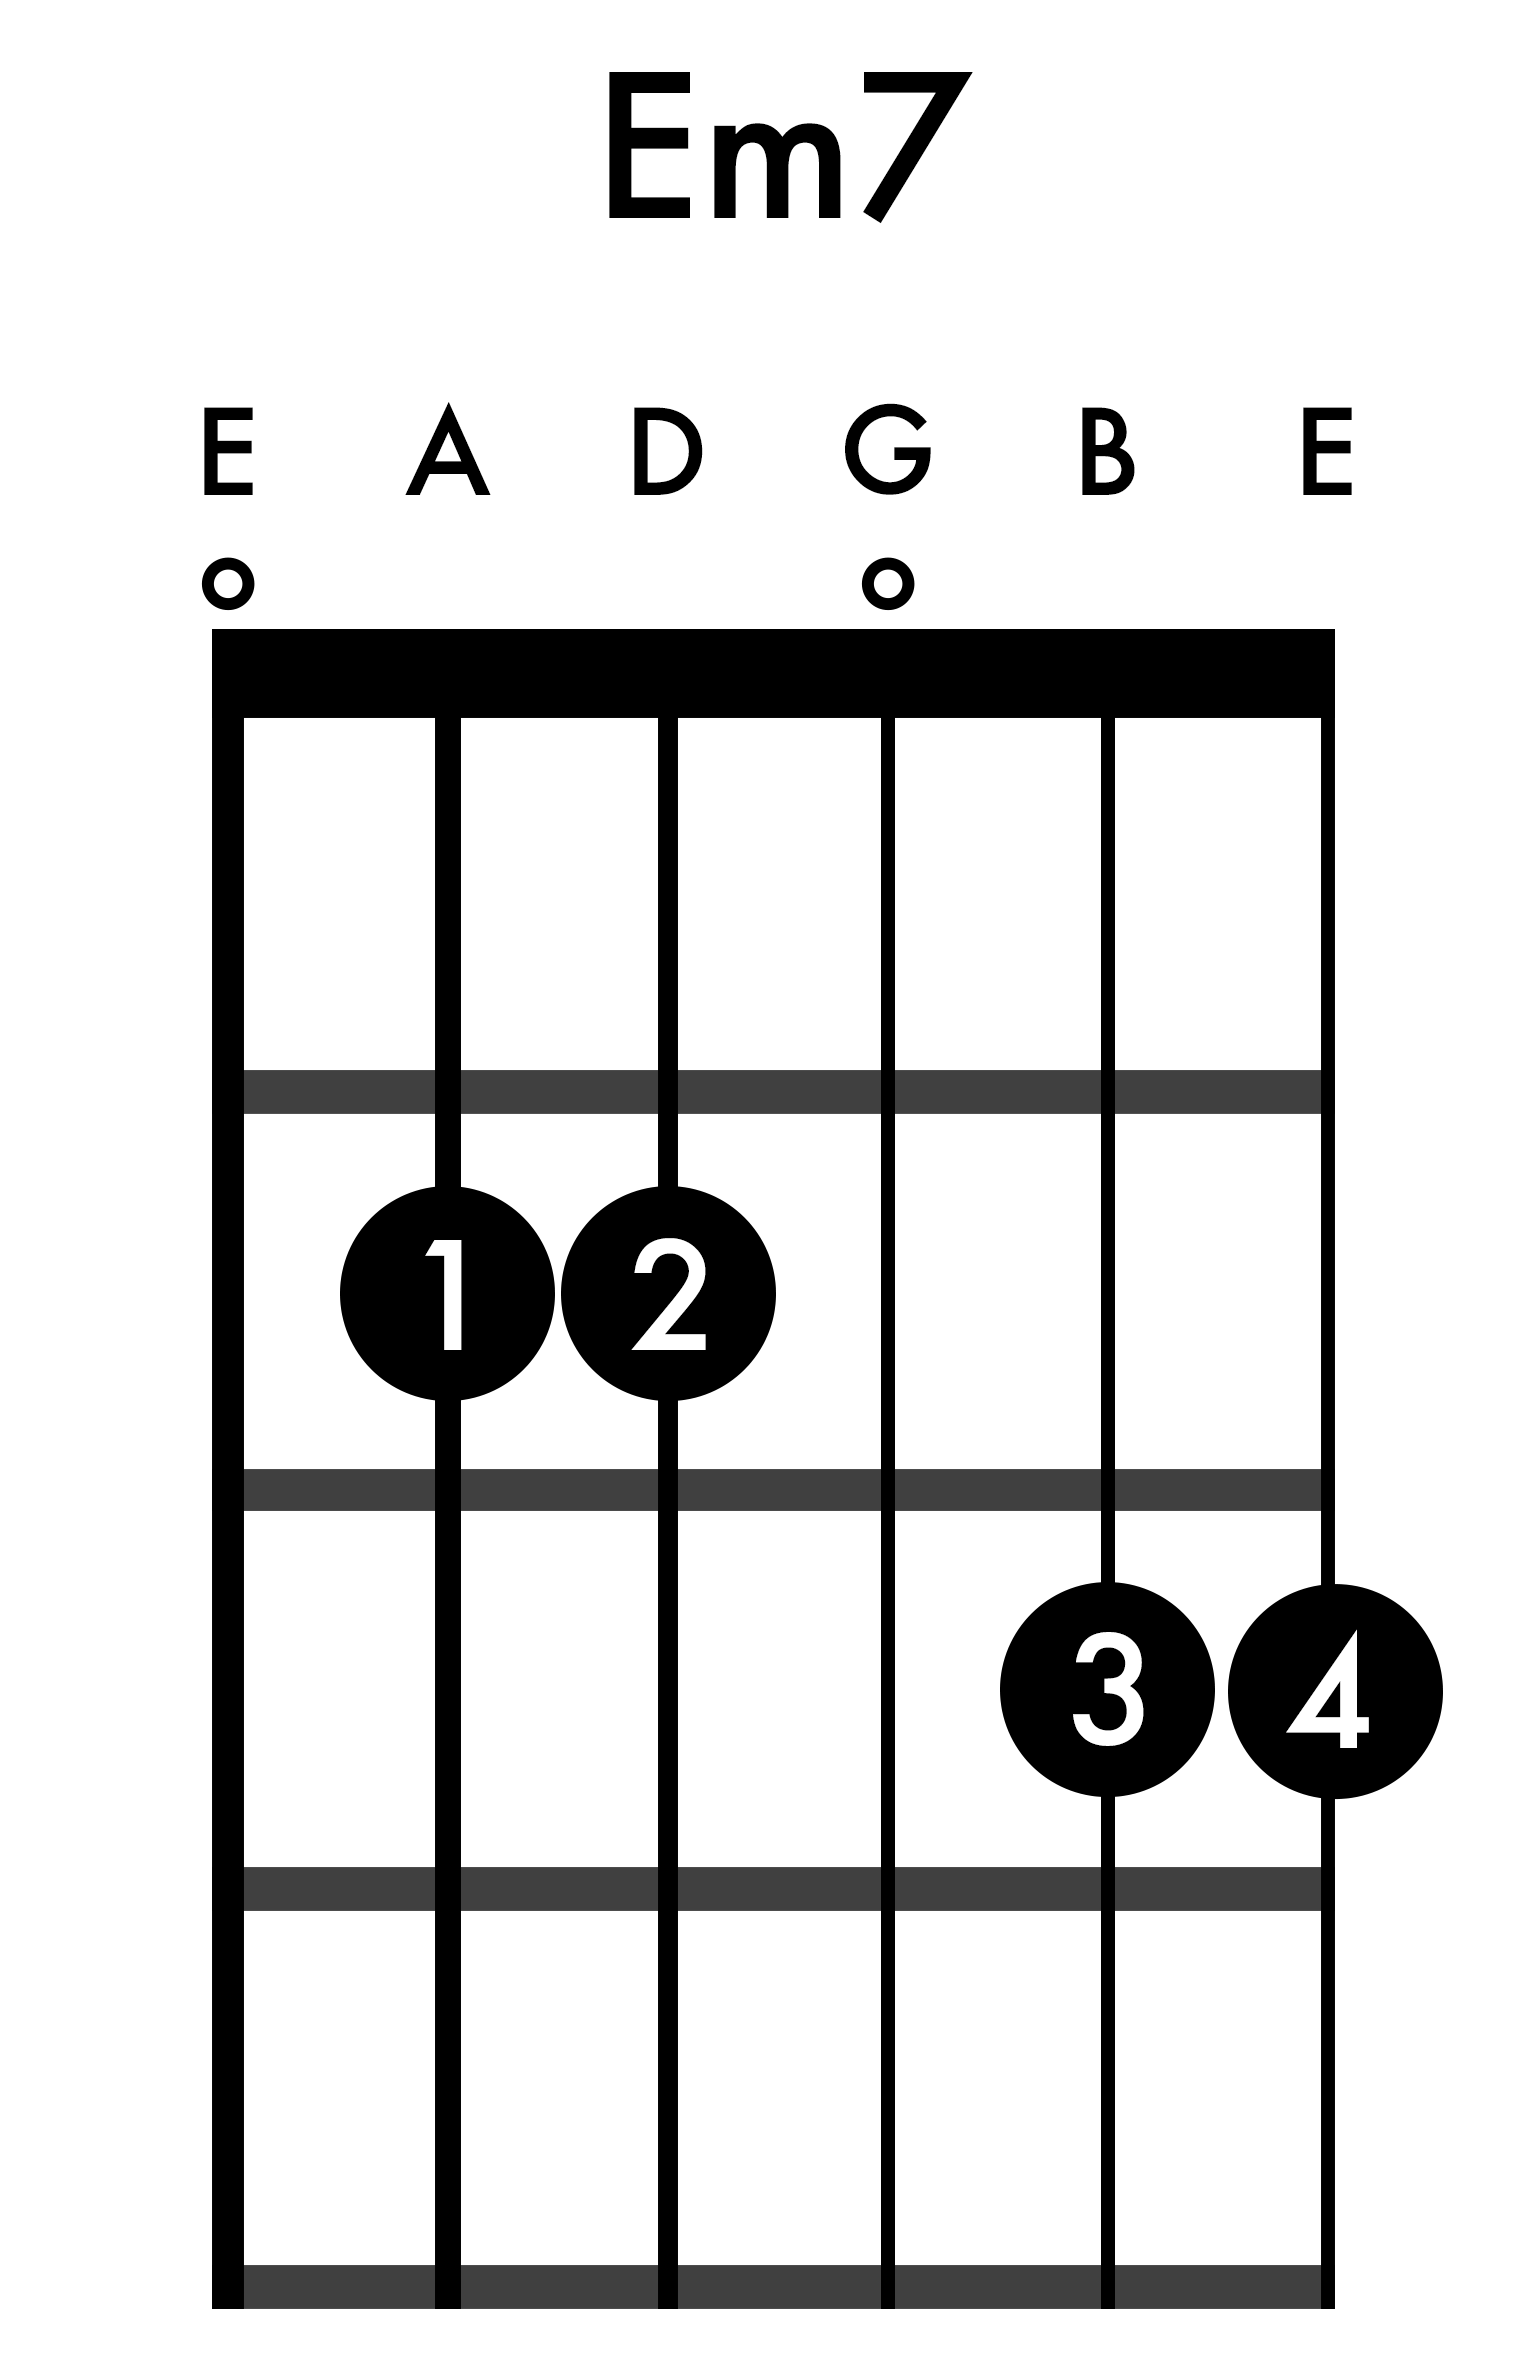
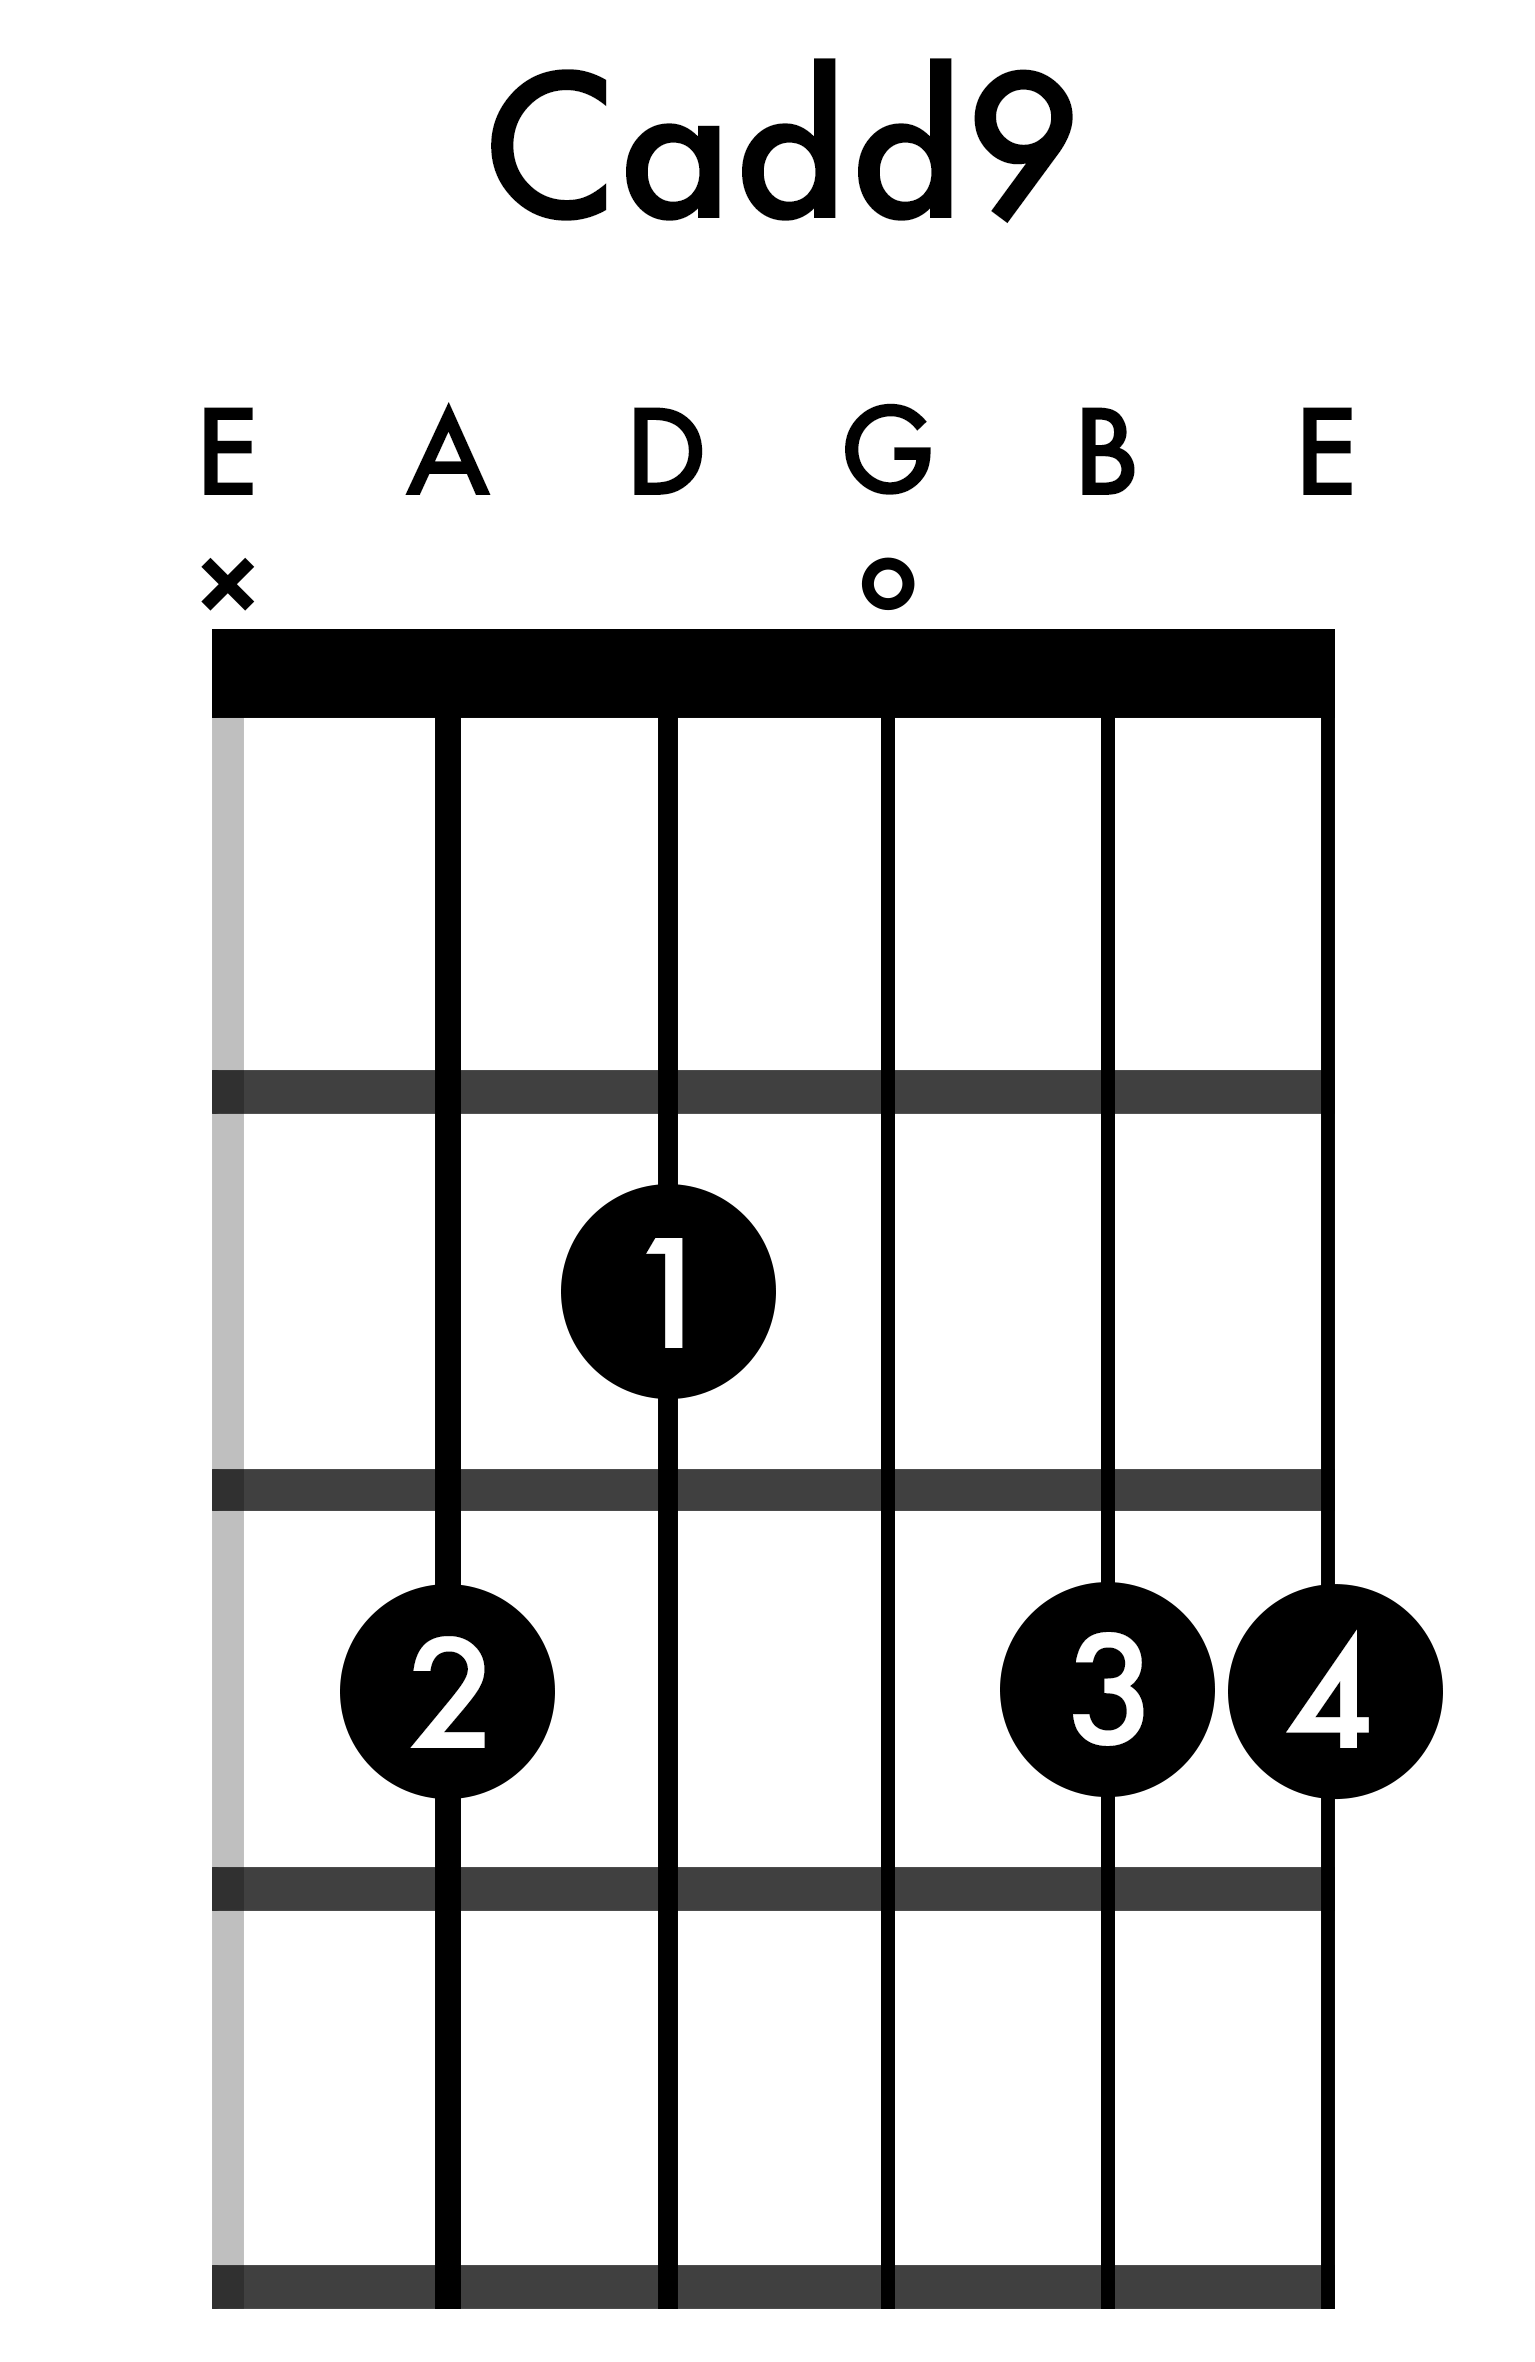
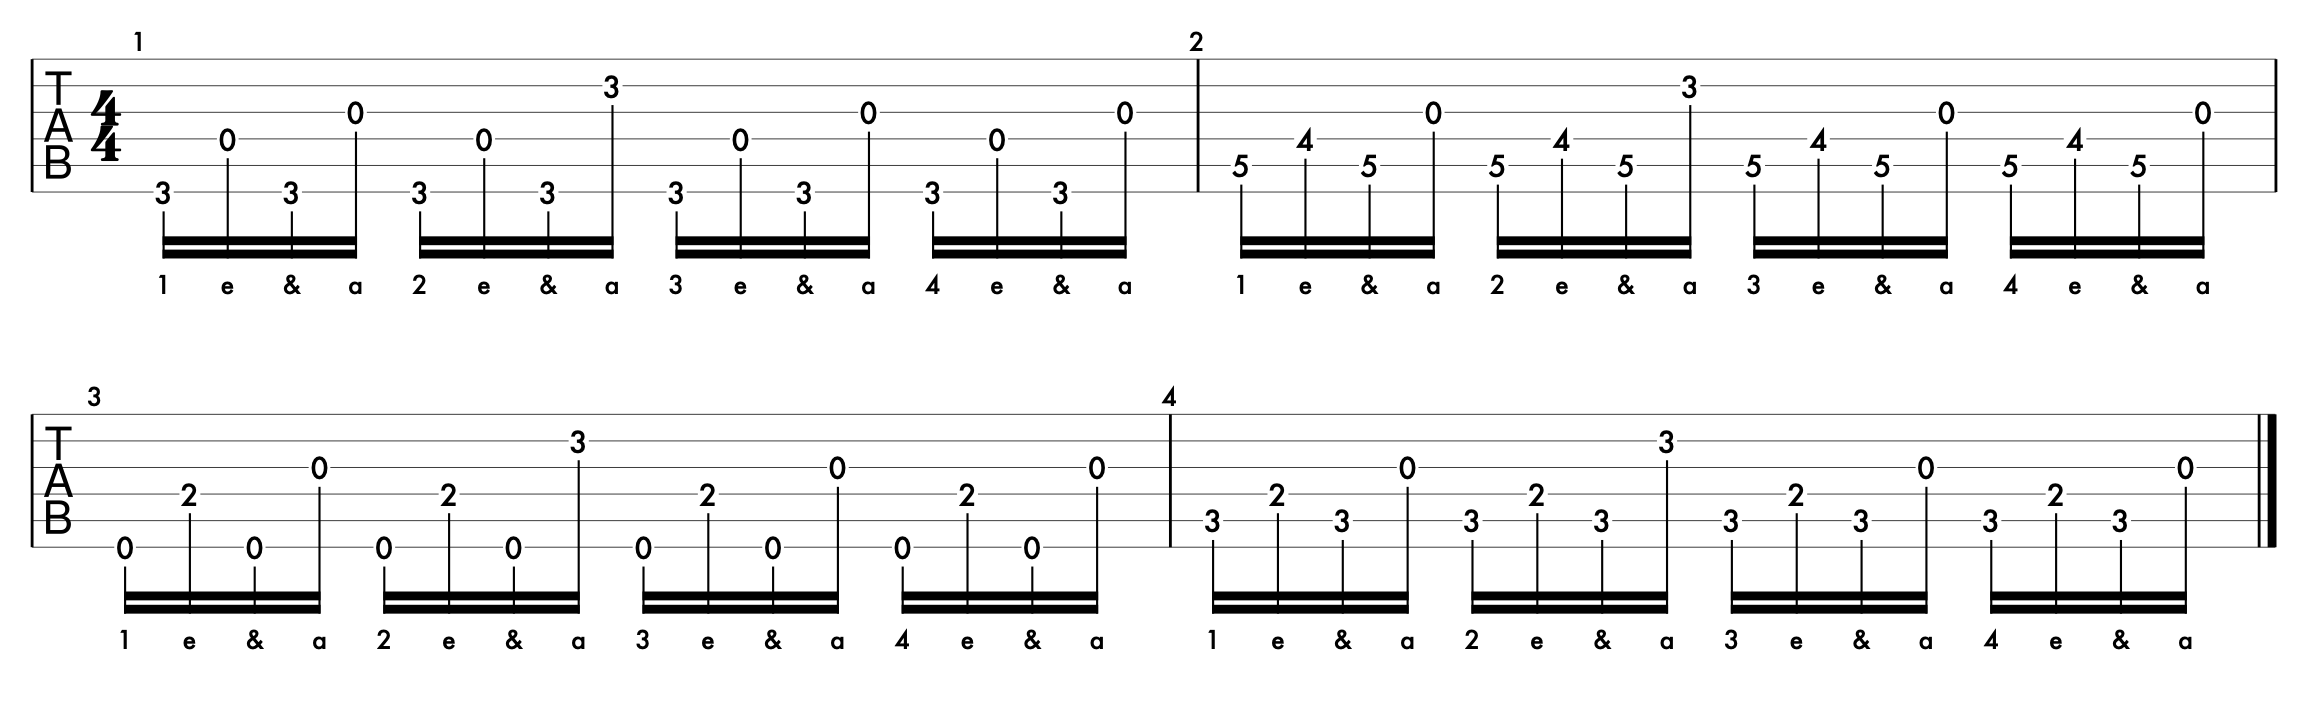
Fig. 7
So far we’ve only been using this fingerpicking pattern with some pretty standard open chord shapes. All of these shapes have the same D and G notes in them, which creates a cool melodic hook that rings out in every chord in the progression.
However, we’re not just limited to using the pattern like this. We can apply the same fingerpicking pattern to other sets of strings. Instead of using the first, second and third fingers of our right hand to play the D, G, and B strings, we can instead use them to play the G, B, and E strings. Or, if we wanted to get really dangerous, we could spread the pattern out even further across the strings.

In the example above, we’re alternating between a G6 and a Gadd9 chord, but there is no limit to the number of cool sounds you can create with this fingerpicking pattern and any number of interesting chord shapes.


Here is another example using an easy Gmaj7 to Cmaj7 chord change.
I love this pattern because it sounds so complex, but also beautifully simple at the same time. Our thumb is pounding out a predictable and rhythmic bass line, our first finger is filling in the harmony, and our second and third fingers are hanging out to provide cool melodic accents by highlighting the top notes in each chord.

A guitarist who has learned all the notes on the fretboard: Can more effectively learn scales and chords; Has a better understanding of keys, intervals, and scale degrees; Is able to more easily memorise songs; Has a greater capacity to understand music theory; Is more effectively able to develop their aural skills; Gets ‘lost’ far less frequently when they are improvising on the guitar.